
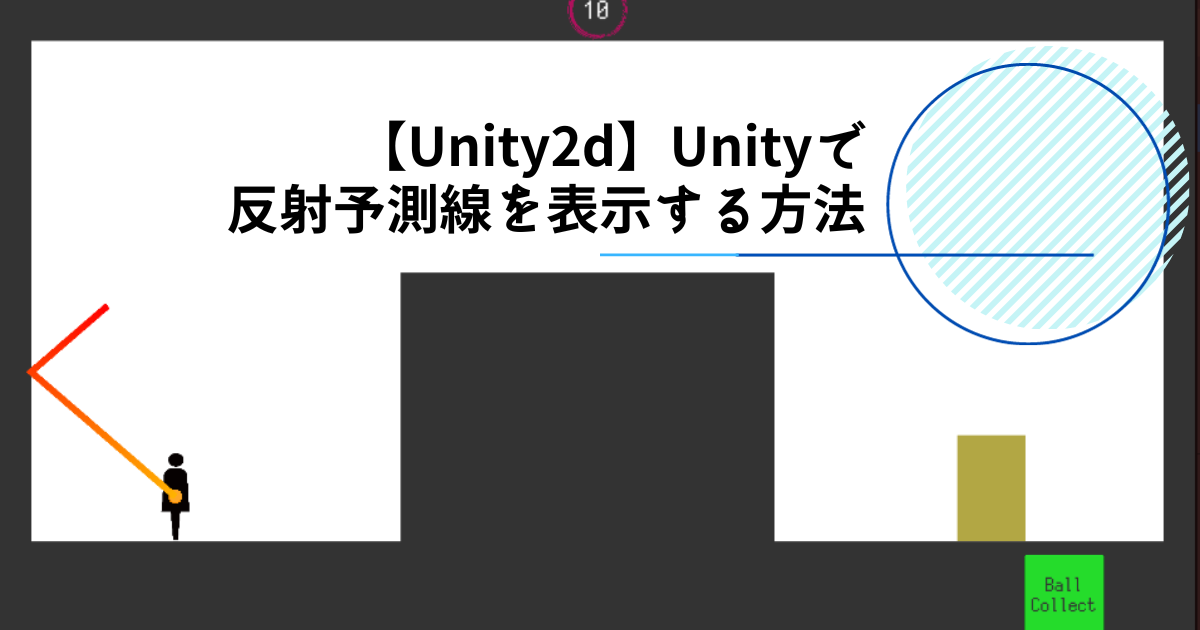
Unity2Dで反射予測線を表示する方法を備忘録として残します。
完成すると下記のような動きとなります。
実現したい内容
今回実現したい内容は下記の通りです。
- マウスクリック後ドラッグした向きと距離で反射予測線の長さを変える
- 予測線は壁にぶつかると反射後の軌道を表示する
ソースコード
基本的には下記のサイトを参考にしました。
一部自身の環境でうまくいかなかったところがあるため修正しています。
下記が壁に反射予測線を表示するソースコードです。
反射予測線を使用するオブジェクトに適用するコード
using UnityEngine;
using UnityEngine.Serialization;
using Utility;

namespace CollectReflect.Scripts
{
    public class PlayerController : MonoBehaviour
    {
        //発射方向
        private Vector2 _launchDirection;
        //ドラッグ開始位置を取得する
        private Vector2 _dragStart = Vector2.zero;
        //リジッドボディ
        private Rigidbody2D _rigidBody;
        //反射予測線の最大値
        [SerializeField] private float maxMagnitude = 30f;
        //予測線の描画
        [SerializeField] private LineRenderer predictionLineRenderer;
        //生成するミツバチ
        [SerializeField] private HoneyBee honeyBeePrefab;
        //wallLayerを指定
        [SerializeField] private LayerMask wallLayer;

        /// <summary>
        /// 起動時に呼び出される関数
        /// </summary>
        private void Awake()
        {
            //オブジェクトの位置を取得するためにリジッドボディの取得
            _rigidBody = GetComponent<Rigidbody2D>();
            //ミツバチの生成
            HoneyBee honeyBee = Instantiate(honeyBeePrefab, this.transform, false);
        }
        /// <summary>
        /// ドラッグ開始イベントハンドラ
        /// </summary>
        public void OnMouseDown()
        {
            //描画線の予測を有効にする
            predictionLineRenderer.enabled = true;
            //ドラッグの開始位置をワールド座標で取得する
            _dragStart = GetMousePosition();
        }
        /// <summary>
        /// ドラッグ中イベントハンドラ
        /// </summary>
        public void OnMouseDrag()
        {
            //ドラッグ中のマウスの位置をワールド座標で取得する。
            var position = GetMousePosition();
            //ドラッグ開始点からの距離を取得する
            var currentForce = _dragStart - position;
            // MaxMagnitudeに直線の長さの制限を指定しておきそれを超える場合は、最大値となるようにします。
            if (currentForce.magnitude > maxMagnitude)
            {
                currentForce *= maxMagnitude / currentForce.magnitude;
            }
            //反射予測線を描画する
            DrawLineOfReflection(currentForce);
        }
        /// <summary>
        /// ドラッグ終了イベントハンドラ
        /// </summary>
        public void OnMouseUp()
        {
            predictionLineRenderer.enabled = false;
        }
        /// <summary>
        /// ワールド座標のマウスの場所を取得
        /// </summary>
        /// <returns>マウスポジション</returns>
        private Vector2 GetMousePosition()
        {
            //マウスの場所を取得
            Vector2 position = Input.mousePosition;
            //ワールド座標に変換
            return Camera.main.ScreenToWorldPoint(position);
        }
        /// <summary>
        /// 反射予測線の描画
        /// </summary>
        /// <param name="currentForce">反射予測線の方向と大きさ</param>
        private void DrawLineOfReflection(Vector2 currentForce)
        {
            var poses = Physics2DUtil.RefrectionLinePoses(_rigidBody.position, currentForce.normalized, currentForce.magnitude, wallLayer).ToArray();
            predictionLineRenderer.positionCount = poses.Length;
            for (var i = 0; i < poses.Length; i++)
            {
                predictionLineRenderer.SetPosition(i, poses[i]);
            }
        }
    }
}
反射予測線を描画するコード
using System.Collections.Generic;
using UnityEngine;

namespace Utility
{
    public class Physics2DUtil
    {
        //最大ヒット回数
        private const int MAX_HIT_COUNT = 10;
        public static List<Vector2> RefrectionLinePoses(Vector2 position, Vector2 direction, float length, LayerMask layerMask)
        {
            var points = new List<Vector2>() { position };
            var hit = Physics2D.Raycast(position, direction, length, layerMask);
            int hitcount = 0;
            while (hit)
            {
                if (hit.point != position)
                {
                    //HITした場所の情報を記録
                    position = hit.point;
                    points.Add(position);
                    length -= hit.distance;
                    direction = Vector2.Reflect(direction, hit.normal);
                }
                else
                {
                    //HITが同じ場所で発生する場合があるためそれを防ぐ目的、direction分少しずらす
                    position = hit.point + direction;
                }
                hit = Physics2D.Raycast(position, direction, length, layerMask);
                //同じ場所で複数回ヒットしてしまったとき無限ループしてしまうので
                //最大ヒット回数以上の場合はループを抜けるようにする
                hitcount += 1;
                if (hitcount > MAX_HIT_COUNT) break;
            }
            points.Add(position + direction * length);
            return points;
        }
    }
}
反射予測線を出すオブジェクトのInspectorはこんな感じです。
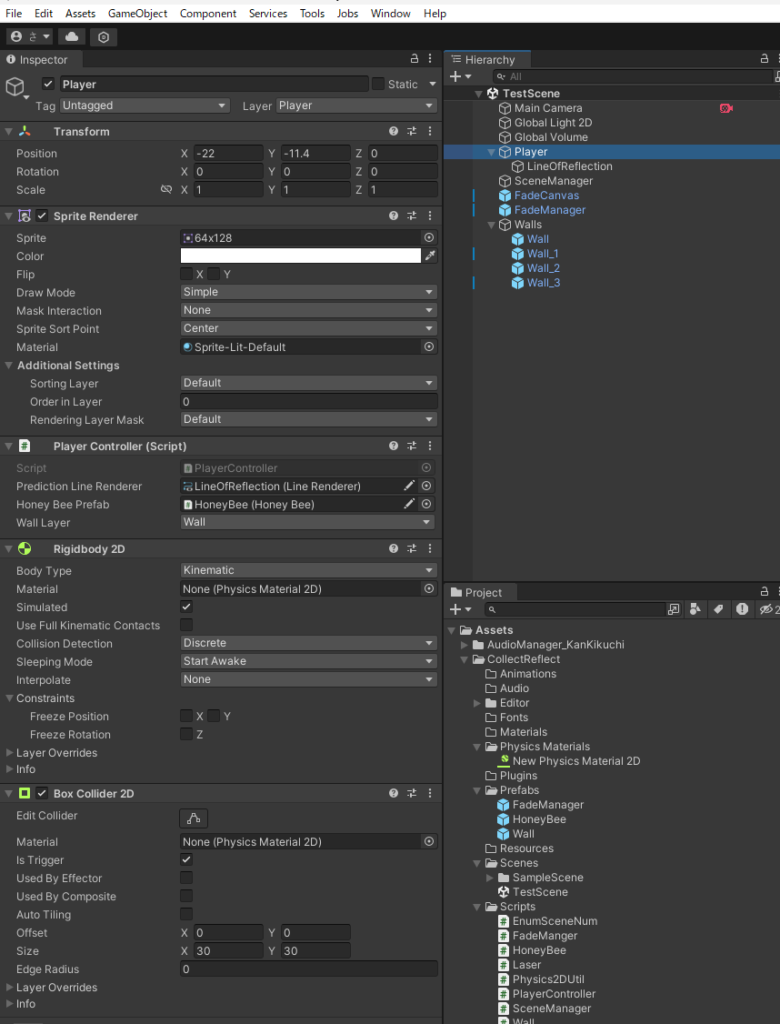
表示する予測線(LineRenderer)のInspectorはこんな感じです。
一つずつ説明していきます。
        /// <summary>
        /// ドラッグ開始イベントハンドラ
        /// </summary>
        public void OnMouseDown()
        {
            //描画線の予測を有効にする
            predictionLineRenderer.enabled = true;
            //ドラッグの開始位置をワールド座標で取得する
            _dragStart = GetMousePosition();
        }
/// <summary>
/// ワールド座標のマウスの場所を取得
/// </summary>
/// <returns>マウスポジション</returns>
private Vector2 GetMousePosition()
{
//マウスの場所を取得
Vector2 position = Input.mousePosition;
//ワールド座標に変換
return Camera.main.ScreenToWorldPoint(position);
}ドラッグが開始された時に呼び出されるイベントハンドラです。
GetMousePosition()でドラッグの開始位置をワールド座標に変換し取得しています。
        /// <summary>
        /// ドラッグ中イベントハンドラ
        /// </summary>
        public void OnMouseDrag()
        {
            //ドラッグ中のマウスの位置をワールド座標で取得する。
            var position = GetMousePosition();
            //ドラッグ開始点からの距離を取得する
            var currentForce = _dragStart - position;
            // MaxMagnitudeに直線の長さの制限を指定しておきそれを超える場合は、最大値となるようにします。
            if (currentForce.magnitude > maxMagnitude)
            {
                currentForce *= maxMagnitude / currentForce.magnitude;
            }
            //反射予測線を描画する
            DrawLineOfReflection(currentForce);
        }
/// <summary>
/// 反射予測線の描画
/// </summary>
/// <param name="currentForce">反射予測線の方向と大きさ</param>
private void DrawLineOfReflection(Vector2 currentForce)
{
var poses = Physics2DUtil.RefrectionLinePoses(_rigidBody.position, currentForce.normalized, currentForce.magnitude, wallLayer).ToArray();
predictionLineRenderer.positionCount = poses.Length;
for (var i = 0; i < poses.Length; i++)
{
predictionLineRenderer.SetPosition(i, poses[i]);
}
}ドラッグ中に呼び出されるイベントハンドラです。
ドラッグ開始時と現在の位置の差を求めて反射予測線の向き、長さを決定します。
反射予測線は下記の部分で設定した長さを超えないように制限しています。
       // MaxMagnitudeに直線の長さの制限を指定しておきそれを超える場合は、最大値となるようにします。
            if (currentForce.magnitude > maxMagnitude)
            {
                currentForce *= maxMagnitude / currentForce.magnitude;
}また、DrawLineOfReflection(currentForce);で反射予測線を描画します。
            var poses = Physics2DUtil.RefrectionLinePoses(_rigidBody.position, currentForce.normalized, currentForce.magnitude, wallLayer).ToArray();
            predictionLineRenderer.positionCount = poses.Length;
            for (var i = 0; i < poses.Length; i++)
            {
                predictionLineRenderer.SetPosition(i, poses[i]);
            }
posesには壁とぶつかった地点(反射地点)の座標が入るので、
反射地点同士をつなぎ合わせて描画します。
参考サイトとは異なりfor文で反射地点同士をつなげています。
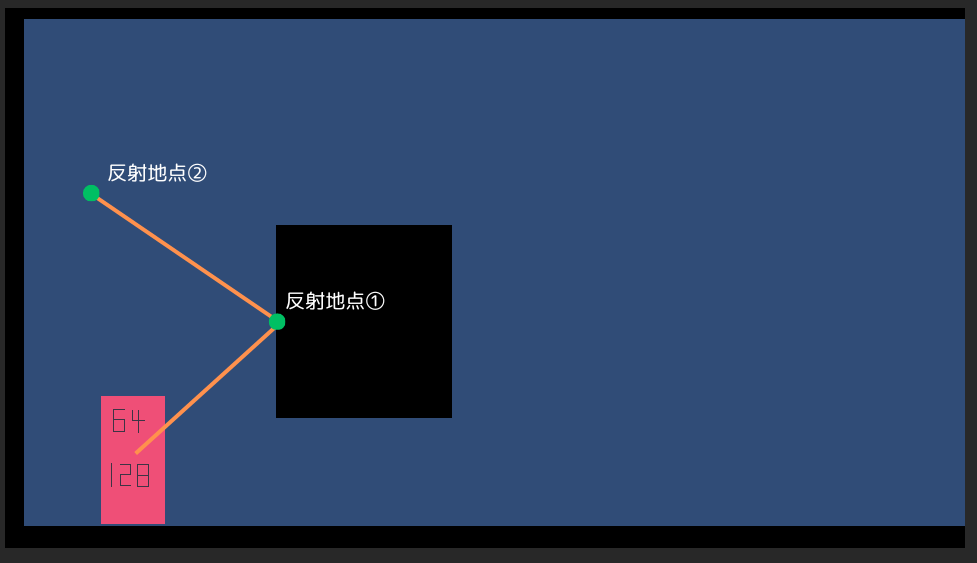
Physics2DUtil.RefrectionLinePosesでは反射地点を取得しています。
        //最大ヒット回数
        private const int MAX_HIT_COUNT = 10;
        public static List<Vector2> RefrectionLinePoses(Vector2 position, Vector2 direction, float length, LayerMask layerMask)
        {
            var points = new List<Vector2>() { position };
            var hit = Physics2D.Raycast(position, direction, length, layerMask);
            int hitcount = 0;
            while (hit)
            {
                if (hit.point != position)
                {
                    //HITした場所の情報を記録
                    position = hit.point;
                    points.Add(position);
                    length -= hit.distance;
                    direction = Vector2.Reflect(direction, hit.normal);
                }
                else
                {
                    //HITが同じ場所で発生する場合があるためそれを防ぐ目的、direction分少しずらす
                    position = hit.point + direction;
                }
                hit = Physics2D.Raycast(position, direction, length, layerMask);
                //同じ場所で複数回ヒットしてしまったとき無限ループしてしまうので
                //最大ヒット回数以上の場合はループを抜けるようにする
                hitcount += 1;
                if (hitcount > MAX_HIT_COUNT) break;
            }
            points.Add(position + direction * length);
            return points;
        }
下記の部分を条件分岐を追加しています。
コメントに書いてある通り、なぜか同じ反射地点で複数回HITの判定が出てしまうので、
その場合は反射後の単位ベクトル分位置をずらします。
                if (hit.point != position)
                {
                    //HITした場所の情報を記録
                    position = hit.point;
                    points.Add(position);
                    length -= hit.distance;
                    direction = Vector2.Reflect(direction, hit.normal);
                }
                else
                {
                    //HITが同じ場所で発生する場合があるためそれを防ぐ目的、direction分少しずらす
                    position = hit.point + direction;
                }
さらに安全策として、ヒット回数が多くなった場合はループを抜けるようにしています。
                //同じ場所で複数回ヒットしてしまったとき無限ループしてしまうので
                //最大ヒット回数以上の場合はループを抜けるようにする
                hitcount += 1;
                if (hitcount > MAX_HIT_COUNT) break;
まとめ
間違いがあるかもしれませんが、反射予測線を描く方法が探しても見つからなかったので今回の記事を書きました。
何か別の方法が何かありましたら教えていただけると幸いです!

コメント